5 Guess the Number: a single round edition
The previous chapter covered Python basics, so now you are ready to start developing you first game! We will build it step by step as there will be a lot to learn about input, libraries, conditional statements, and indentation.
Before you start, create a new folder (inside your course folder) called, for example, “guess-the-number”, download exercise notebook, copy it in the newly created folder, and open it in Jupyter Notebook. As in the chapter before, it will contain exercises on reading and understanding the code.
However, we will be using VS Code to program scripts with the actual game. You will need to create a separate file for each code practice12 (e.g., code01.py13, code02.py, etc.) This is not the most efficient implementation of a version control and it will certainly clutter the folder. But it would allow me to see your solutions for every step, which will make it easier for me to give feedback. For submitting the assignment, just zip the folder and submit the zip-file.
5.1 Chapter concepts
- Documenting code.
- Debugging code.
- Getting input from a user.
- Using comparison in conditional statements.
- Using indentation to group statements together.
- Using Python libraries.
- Generating random numbers.
5.2 The Game
We will program a game in which one participant (computer) picks a number within a certain range (say, between 1 and 10) and the other participant (human player) is trying to guess it. After every guess of the human, the computer responds whether the actual number is lower than a guess, higher than a guess, or matches it. The game is over when the player correctly guesses the number or (in the later version of the game) runs out of attempts.
Our first version will allow just one attempt and the overall game algorithm will look like this:
- computer generates a random number between 1 and 10
- prints it out for debugging purposes
- prompts user to enter a guess
- compares two numbers and print outs the outcome: “My number is lower”, “My number is higher”, or “Spot on!”
5.3 Let’s pick a number
Let us start by implementing just the first two steps of the program. First, create a variable holding a number that computer “picked”. We will name it number_picked (you can use some other meaningful name as well but it might be easier if we all stick to the same name). To make things simpler at the beginning, we will hard-code an arbitrary number between 1 and 10 (pick the one you like). Then, let us print it out, so that we know the number ourselves14. Use string formatting to make things user-friendly, e.g., print out something like “The number I’ve picked is …”. You should be able to do this using the knowledge from the previous chapter. Your code should be a two-liner:
Try out this two-liner in a Jupyter Notebook (create an empty notebook just for that). Once you are happy with it, copy-paste the code into code01.py and read on to learn how to document and run it.
Put your code into code01.py.
5.4 Documenting your code
Now that you have your first file with Python program, you should document it. Documenting a two-lines long and simple program may feel silly but it should be an automatic thing. Later on you will find yourself using several lines of comments to document a single line function. Again, it is not about the code that works, it is about the code you can understand. In a sense, it is better to have a clean well-documented program that currently does not work correctly than an undocumented spaghetti code that does. You can fix and update the former, but maintaining or updating the latter…
In Python, you have two ways to write comments: multiline and single line
Use multiline comments to write documentation for individual files, functions, classes, methods, etc. You will learn how to format this documentation Numpy docstring style, once you learn about functions. In our case, you should start your code01.py file with a multiline comment that briefly describes what program it contains. Minimally, you should write that this is a Guess a Number game. It is probably a good idea to sketch out what the game is about.
Use single line comments to explain what happens in a particular code block. You do not need to comment every line and you should not replicate the code in human language. A comment should be about what is going on not how. You already have a single chunk of code, so document it with a single sentence.
Document code01.py file.
5.5 Running and debugging your game in VS Code
Now that we have a two-lines-long program, we can run it and already start learning how to debug it. Yes, our current program is probably to simple to require actual debugging but it is also simple enough to make understanding debugging easier as well. And debugging is a crucial skill that turns a running program from a black box into something transparent and easy15 to understand. Below I will describe how to debug in VS Code but you might want to consult an official manual in case things have changed in the meantime.
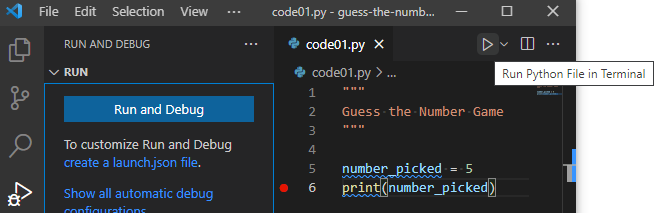
There are two ways to run a Python program in VS Code. First, you can use the “Run Python File in Terminal” play button on the right. This runs your program without a debugger, so you should use it only for the actual runs of the finalized code. Still, you can try running it and see whether it prints out what it should.
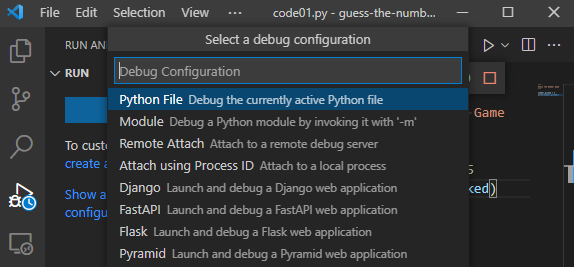
The alternative is the debugging tab, the one with a little bug on top of the run button. If you select it, it will show “Run and Debug”. Click on the button and it will offer various choices for different kinds of Python projects and frameworks. For our intents and purposes, we will only need “Python File: Debug the currently active Python file”. Click on that and it will execute your code (should run exactly the same way as with the other button).
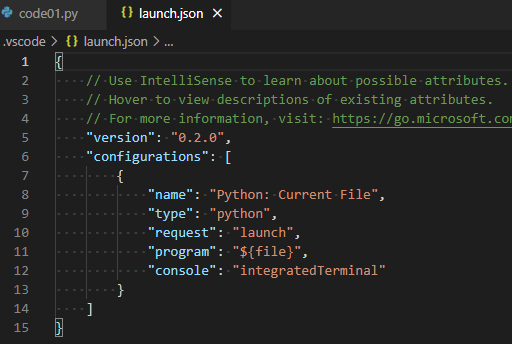
You probably do not want to click through Debugging tab → Run and Debug button → Pick configuration all the time. A better way is to configure it once and for all and then use F5 key to run your code. First, click on “create a launch.json file” and select the “Python File: Debug the currently active Python file” again. You will see a new launch.json file appearing in the editor that should look like this:
That’s it! VS Code created a configuration for you. Now you can close launch.json file and run your program with a simple press of F5 button. Try it! Again, it should work just like before, so why did we go through all this trouble? Because debugger will pause an execution of your code whenever it encounters a problem, giving you a chance to examine variables, run snippets of code, etc. In contrast, running python file in terminal (the first option) will only print an error message and exit the program. Moreover, you can use breakpoints to pause the program at any line, which gives you an opportunity to examine your code at any location that you need.
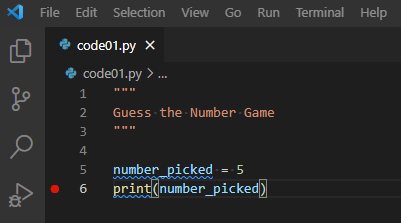
You enable breakpoints by clicking to the left of the line number that you are interested in. Here, I’ve clicked on line 6 and you can see a red dot that indicates an active breakpoint.
If I now run the code via F5, the program will stop at that line before executing it.
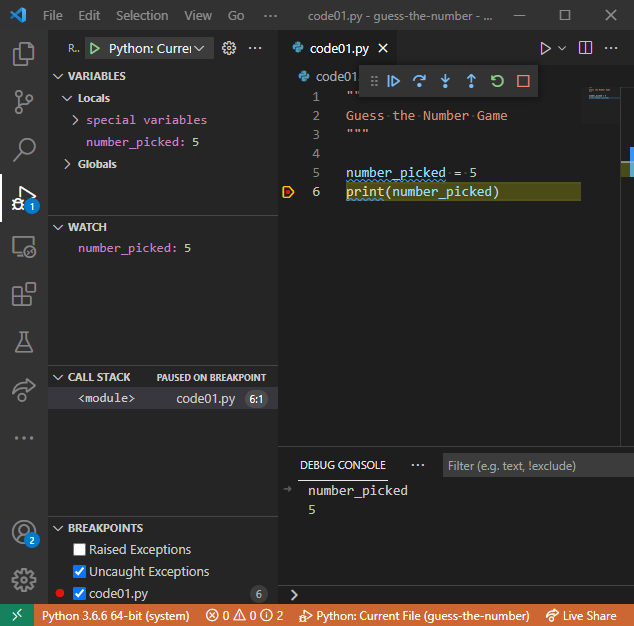
This gives me a chance to see what value my number_picked variable has. It is already listed in local variables (top left). But I also added it to list of watched variables (Watch, left middle) and I also looked at its value in the Debug Console (bottom tab) that allows me to execute any Python code while my program is paused. Do the same and explore these different ways yourself. For example, see how you can compute number_picked + 1 or number_picked * number_picked in the Watch tab and in Debug Console.
Once you are done examining the current state of the program, you have six buttons at the top to decide what to do next (hover over them to see hints). They are, from left to right
- Continue (F5): resume the program.
- Step Over (F10): executes the code without going into functions (this and two following options will become clearer once you learn about writing functions).
- Step Into the code (F11)
- Step Out of the code (Shift+F11).
- Restart the program (Ctrl+Shift+F5).
- Stop the program (Shift+F5).
To better understand how this works, stop the program (Shift+F5) and put an additional breakpoint on the first line of your code (line #5 in my program, the other lines are comments or are empty). Run the program again via F5 and it will pause at that very first line. Can you figure out the value of variable number_picked now?
The answer is “no” because that variable does not exist yet. Remember, the program pauses before executing the line. Use F10 to step through the code line by line to see how the variable appears and the information gets printed out.
This debugging exercise may not have been necessary to solve problems with your current code but it showed how to do that in the future. Do not hesitate to put a breakpoint to pause the program and check that reality (i.e., actual values of variables) matches your expectations. Use the stepping through the code to slow things down to watch and ponder.
5.6 Asking a player for a guess
It takes two to play the Guess the Number game. The computer did its part by picking a number, now we need to ask a player to enter their guess. For this, we will use input() function.
A function is an isolated code that accepts (optional) inputs, performs an action, and, optionally, returns a value (output). This allows both to split the code into smaller chunks that are easier to maintain and to reuse the same code. You already used print() function to print things out, and str(), bool(), int() and float() functions to convert values. For print() input is an arbitrary number of values (even none, try this in Jupiter Notebook!), its action is to print things out, but it returns nothing (no output). float() function takes (somewhat surprisingly) zero or one value as input (try giving it none or more than one in Jupiter Notebook as see the difference), attempts to convert given value to float (throwing an error, if it cannot do it), and returns a float value as an output.
Similar input → action → output scheme holds for the input(prompt). It takes an optional prompt string as input. Then it prints the prompt message and waits for a user to enter a string until they press Enter. It then returns this string value. The latter bit about string is important, because in our game we need a player to enter an integer not a string. For a moment, let us assume that the input is always a valid integer number, so type only valid integers when testing the program! This way we can convert it to an integer without extra checks (will add them in the future) and assign this value to a new variable called guess. Thus, you need to add a single line assignment statement with guess variable on the left side and call to input() function on the right side (think of a nice prompt message) wrapped by (inside of) the type-conversion to integer via int(). Test this code but, again, only enter valid integers, so that the conversion works without an error.
Update your code01.py.
5.7 Conditional if statement
Now we have two numbers: One that computer picked (number_picked) and one that the has player entered (guess). We need to compare them to provide correct output message. For this, we will use conditional if statement:
if some_condition_is_true:
    # do something
elif some_other_condition_is_true:
    # do something else
elif yet_another_condition_is_true:
    # do yet something else
else:
    # do something only if all conditions above are false.
Only the if part is required, whereas elif (short for “else, if”) and else are optional. Thus you can do something, only if a condition is true:
if some_condition_is_true:
    # do something, but OTHERWISE DO NOT DO ANYTHING
    # and continue with code execution

# some code that is executed after the if-statement,
# irrespective of whether the condition was true or not.
Before we can use conditional statements in our game, you need to understand (1) the conditions themselves and (2) use of indentation as a mean of grouping statements together.
5.8 Conditions and comparisons
Condition is any expression that can be evaluated to see whether it is True or False. A straightforward example of such expression are comparisons expressed in human language as: Is today Thursday? Is the answer (equal to) 42? Is it raining and I have an umbrella? We will concentrate on comparisons like that for a moment but later you will see that in Python any expression is either True or False, even when it does not look like a comparison16.
For the comparison, you can use the following operators:
-
“A is equal B” is written as
A == B. -
“A is not equal B” is written as
A != B. -
“A is greater than B” and “A is smaller than B” are, respectively,
A > BandA < B. -
“A is greater than or equal to B” and “A is smaller than or equal to B” are, respectively,
A >= BandA <= B(please note the order of symbols as=>and=<will produce an error).
Go to exercise #1 to solve some comparisons.
Note that Python also has an is operator that may look identical to == (e.g., x == 2 looks equivalent to x is 2). Moreover, in some cases it also works the same way. However, there is a subtle difference: == checks whether values are identical, whereas is checks whether objects (that “hold” values) are identical. You need to understand classes and objects before you can appreciate this difference, so for now just keep in mind that you should only use == (I will explicitly mentioned when is is needed).
You can invert the logical value using not operator, as not True is False and not False is True. This means that A != B is the same as not A == B and, correspondingly, A == B is not A != B. To see how that works, consider both cases when A is indeed equal B and when it is not.
- If A is equal B then
A == Bevaluates toTrue. TheA != Bis thenFalse, sonot A != B→not False→True. - If A is not equal B then
A == Bevaluates toFalse. TheA != Bis thenTrue, sonot A != B→not True→False.
Go to exercise #2 to explore this inversion yourself.
You can also combine several comparisons using and and/or17 or operators. As in human language, and means that both parts must be true: True and True → True but True and False → False, False and True → False, and False and False → False. Same holds if you have more than two conditions/comparisons linked via and: All of them must be true. In case of or only one of the statements must be true, e.g. True or True → True, True or False → True, False or True → True, but False or False → False. Again, for more than two comparisons/conditions at least one of them should be true for the entire expression to be true.
Do exercises #3 and #4.
Subtle but important point: conditions are evaluated from left to right until the whole expression is resolved one way or another. This means that if the first expression in a and is False, the second one (the rest of them) is never evaluated. I.e., if first and second expressions both need to be True and you know that first expression already is false, the whole expression will be False in any case. This means that in the code below there will be no error, even though evaluating int("e123") alone would raise a ValueError.
However, reverse the order, so that int("e123") == 123 needs to be evaluated first and you get the error message
Similarly, if any expression in or is True, you do not need to check the rest.
However, if the first condition is False, we do need to continue (and stumble into an error):
Do exercise #5.
Finally, like in simple arithmetic, you can use brackets () to group conditions together. Thus a statement “I always eat chocolate but I eat spinach only when I am hungry” can be written as food == "chocolate" or (food == "spinach" and hungry). Here, the food == "chocolate" and food == "spinach" and hungry are evaluated independently, their values are substituted in their place and then the and condition is evaluated.
Do exercise #6.
Final thought on comparisons: Do not hesitate to test them in Jupyter Notebook using various combinations of values or pause the program at the condition via a breakpoint and evaluate a comparison in Watch or Debug Console.
5.9 Grouping statements via indentation
Let us go back to a conditional if-statement. Take a look at following code example (and note an : at the end of the if some_condition_is_true:), in which statement #1 is executed only if some condition is true, whereas statement #2 is executed after that irrespective of the condition.
Both statements #1 and #2 appear after the if-statement, so how does Python know that the first one is executed only if condition is true but the other one always runs? The answer is indentation: The 4 (four!) spaces that are automatically added whenever you press Tab in VS Code and removed whenever you press Shift+Tab. The indentation puts statement #1 inside the if-statement. Thus, indentation shows whether statements belong to the same group and must be executed one after another (same indentation level for if and statement #2) or are inside conditional statement, loop, function, class, etc. (statement #1). For more complex code that will have, for example, an if-statement inside an if-statement inside a loop, you will express this by adding more levels of indentation. E.g.
# some statements outside of the loop (0 indentation)
while game_is_not_over: # (0 indentation)
    # statements inside of the loop
    if key_pressed: # (indentation of 4)
        # inside loop and if-statement
        if key == "Space": # (indentation of 8)
            # inside the loop, and if-statement, and another if-statement
            jump() # (indentation of 12)
        else: # (indentation of 4)
            # inside the loop, and if-statement, and else part of another if-statement
            stand() # (indentation of 12)

    # statements inside of the loop but outside of the outermost if-statement
    print(key) # (indentation of 4)

# some statements outside of the loop (0 indentation)
Pay very close attention to the indentation as it determines which statements are executed together! A wrong indentation level is unfortunately a very common mistake.
Do exercise #7.
The if and ifelse statements are evaluated until one of them turns out to be True. After that any following ifelse and else statements are simply ignored.
Do exercise #8.
5.10 Checking the answer
Now you have all necessary tools to finish the first version of our game. Add a conditional statements to your code01.py, so that
- if the computer pick is smaller than player’s guess, it will print
"My number is lower!" - if the computer pick is larger than player’s guess, it will print
"My number is higher!" - if two numbers are identical, it will print
"Spot on!"
First, save a copy of your original code into code02.py and then add the comparison and printing.
Extend your program with the comparison incode02.py
Test that your code works. Again, use breakpoints if you need to better understand the control flow and check whether comparisons work the way you expect.
5.11 Using libraries
Our game is “feature-complete”: computer picks a number, player makes a guess, computer responds appropriately. However, currently we are playing for both sides. Lets make computer pick a random number itself. For this we need to use randint(a, b) function. It is a part of any Python distribution, so you would have it even if you install a vanilla Python distribution instead of using one from PsychoPy. However, you cannot use it straightaway like you did with print() or input(). Type randint(1, 3) in your Jupyter Notebook and observe NameError: name ‘randint’ is not defined.
The reason for this is that Python has an awful lot of functions and loading them all at the same time would clog the memory with things you never intended to use. Instead, they are packaged into libraries, so that you can import only functions (or libraries) that you actually need for your program. You import them via an import statement that should go to the top of your file (but below the comment about the file content). There are several ways you can import libraries. First, you can import an entire library (such as random library that has function randint() that we need) and then use its functions as <library>.<function>. For randint this would be
I would suggest this as a preferred way of using libraries as it forces you to explicitly mention the name of the library when calling a function, i.e. random.randint() instead of just randint(). This may not look important with just one imported library but even in a modestly-sized project you will import many libraries, so figuring out which library the function belongs to will be tricky. Even more importantly, different libraries may have functions with the same name. In this case, the function you are using will come from the last library you imported. But you may not realize this and this is a sort of mistake that is really hard to track down. Thus, unless you have a very good reason to do otherwise, always import the entire library and use library. notation!
Another and less explicit option is to import only some functions and use them without the library. prefix. You can import more than one function by listing them all
You can also rename a library or a function while importing it via as. In short, you should not do this as using a different name for a library or a function would make it harder for others (and even for future-you) to understand your code. However, there are some “standard” renaming patterns that are used universally and which you are likely to encounter.
# this is a standard way to import these two libraries
import numpy as np
import pandas as pd

np.abs(-1)

# you can rename individual functions as well, if you really have to (but, please, don't!)
from random import randint as random_integer

computer_pick = random_integer(1, 5)
Finally, there is a very bad way to import functions from a library: from random import *. The asterisk means that you want to import all functions from the library and you want to call them by their names without random. prefix. Never, never, never18 do this! This fills your environment with functions that you may not be aware of, potentially overwriting some other functions, creating conflicts, etc. Never ever! I am showing you this only because you will, at some point, see a code that uses this approach and you might think that this is a good idea. It is a terrible idea! Import the library, not the functions, so you can explicitly show which library you are relying on when calling a function. Always remember the Zen of Python: “Explicit is better than implicit.”
5.12 Picking a number randomly
Now that you know how to import a library, we can use randint() function. For this, save a copy of your previous code into code03.py. Import the library and use randint() to generate a random number between 1 and 10. Read the documentation on randint() to understand how to use it. Reading manuals is a necessary part of programming, so this is a good point to start practicing.
Once you implemented this in code02.py, run it several times to check that computer does pick different random values. Again, use breakpoints if you want to double-check what is going on.
Put your code into code03.py.
Congratulations, you just programmed your first computer game! Yes, it is very simple but it has key ingredients: a random decision by computer, user input, and feedback. Next time, you will learn about loops to allow for multiple attempts and will start writing functions to make your code modular and reliable. In the meantime, let us solidify your knowledge by programming yet another game!
5.13 One-armed bandit (a single round edition)
You know everything you need to program a simple version of an “one-armed bandit” game. Here is the game logic:
- Import random library, so you could use
randintfunction - Generate three random integers (say, between 1 and 5) and store them in three variables
slot1,slot2, andslot3. - Print out the numbers, use string formatting to make it look nice.
- In addition,
- if all three values are the same, print
"Three of a kind!". - If only two numbers match, print
"Pair!". - Do not print anything, if all numbers are different.
- if all three values are the same, print
Do not forget to document the new code03.py file and feel free to use breakpoints to debug it.
Put your code into code04.py.