16 Space invaders: mixins and duck typing
Today we will program a classic Space Invaders game with a twist. We will be using object-oriented programming but you will learn about mixins and duck typing. Previously, you have learned how to ensure generalization — common behavior for different classes — via inheritance. E.g., when all visual stimuli inherit from the save BaseVisualStim class, you can be sure that they all have size, ori, and pos properties and that you can draw() them. However, this approach may not be best suited for cases when the same class must implement several different behaviours. One solution is to use multiple inheritance, so that a class is a descendant of several classes and, thus, get behavior from many of them. This is the canonical way of ensuring generalization but you can achieve same means differently.
16.1 Mixins
One way to infuse a common behavior into different classes is via a mixin classes. These are classes that only define a single behavior (i.e., a method) and nothing else. No constructor and, typically, no attributes. Thus, they are too limited to be used on their own but can be inherited from (mixed into the proper class) enabling that single behavior in the descendant.
Think about all creatures that can fly: insects, birds, bats, astronauts, etc. They do have a common ancestor but that common ancestor did not have the ability to fly. Instead, each line evolved that ability independently and all have evolutionary “cousins” that cannot fly. When programming, you can follow the same pattern of creating a common ancestor for flying and non-flying insects, then implementing ability to fly in the former. Do the same for birds, bats, astronauts, etc. If your implementation must be very detailed and creature-specific, this might be unavoidable. However, if your ability to “fly” is very abstract and, therefore, the same for all creatures in question, you will end up writing the same code for every insect, bird, bat class. An easy copy-paste, of course, but that means you get multiple places with identical implementation, so when you need to change it, you will have to make sure that you do it in all the places (and you gonna miss some, I always do). Alternative? Mixins! You create a class FlightAbility that implements that common abstract “flying” and, then, you inherit from that class whenever you need a flying someone. Mix a non-flying bird with the FlightAbility and it can fly! Mix it with an insect: Flying insect! You may also mix in more than one ability. Again, start with a bird that just walks around (a chicken). Add a mixin FlightAbility and you get a flying bird (a pigeon). Take the walking bird again and mix in SwimAbility and you get a swimming bird (a penguin). Mix in both and you get a bird that can both fly and swim (a swan)!
You may not need mixins frequently but they are a powerful way of creating an isolated behavior that different classes might need without enforcing strict inheritance structure. PsychoPy is big on mixins. For example, it has ColorMixin that could be mixed-in to a visual class that needs to work with color, so it implements all the repetitive98 code for translating an arbitrary color representation (string, hexadecimal code, RGB triplet, HSL triplet, single grayscale value, etc.) into the internal RGB color value. It also has TextureMixin for classes that use textures for drawing objects. In our Space Invaders game, we will use a Mixin class to mix in a “boom sound when exploded” behavior, common to both aliens and the player’s ship.
16.2 Duck typing
Alternatively, you might need your object to behave in a certain way but having a proper class hierarchy is an overkill because this is only one class and you might want some but not all the functionality. The idea is to use “duck typing”, which comes from saying “If it walks like a duck, and it quacks like a duck, then it must be a duck.” In other words, if the only things you care about are walking and quacking, do you need it to be an actual duck99? Will a goose that can walk and quack the same way do? Will a dog that can walk and quack like a duck do? Obviously, the correct answer is “it depends” but in a lot of situations you are interested in a common behavior rather than in a common ancestor.
Duck typing is a popular method in Python. For example, len(object) is a canonical way to compute length of an object. That object could be a string len("four"), or a list len([1, 2, 3, 4]), a tuple len(tuple(1, 4, 2)), a dictionary len({"A": 1, "B": 5}), etc. The idea is that as long as a class has a concept of length (number of elements, number of characters, etc.), you should be able compute its length via len(). This is achieved by adding a special method to the class __len__(self) that must return an integer. This is called a “hook method”, as it is never called directly but is “hooked” to the len() function call. Thus, whenever you write len(object), it is actually translated into object.__len()__100.
Another popular duck typing application is an implementation of an iterator: an object that yields one item at a time, so you can do lazy computation101 or loop over them. You already know how to implement an iterator as a function but it also be defined as a class with two special methods: __iter__(self) and __next__(self). The former is called when iteration starts and it should perform a necessary initialization (e.g., setting internal counter to 0, shuffling elements, etc.) and must return an iterator object (typically, a reference to itself). The __next()__ method is called whenever the next item is needed: if you use iterator in the for loop, it is called automatically or you can call it yourself via next(iterator_object). __next()__ must return the next item or raise a StopIteration exception, signalling that it ran out of items.
Note that an iterator does not require an implementation of the __len()__ method! How come? If you have items you can iterate over, doesn’t it make sense to also know how many (length of an object)? Not necessarily! First, if you use an iterator in a for loop and you just want to iterate over all of the items until you run out of them (which is signaled by the StopIteration exception). Thus, their total number and, hence, len() method is of little interest. Accordingly, why implement a function that you do not need102? Second, what if your iterator is endless (in that case, it is called a generator)? E.g., every time __next__() is called it returns one random item or a random number. This way, it will never run out of items, so the question of “what is its length” is meaningless unless you take “infinity” as an answer. This lack of need for __len__() for iterators is the spirit of duck typing: implement only the methods you need for your duck, ignore the rest.
Below, you will practice duck typing by implementing both __len()__ and two special iterator methods as part of our AlienArmada class.
16.3 Which one to use?
Now you know three methods to produce common behavior: proper inheritance, mixins, and duck typing. Which one should you use? Depends on what you need. If you have many classes and you can have a well defined inheritance tree, use it. However, if you have some specific behavior that you need in some classes that is hard to fit with the inheritance tree, use mixins. If you have a single class that needs very specific functionality, such as an iterator: use duck typing. Using any one of them does not preclude you using others, but be moderate, using too many different paradigms will be confusing for you and a reader.
16.4 Space Invaders
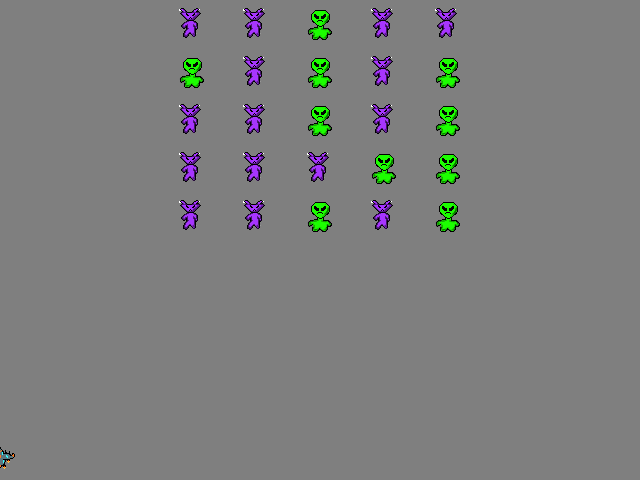
We will program a simple version of the game with a gradually descending alien armada. Your task is to capture all aliens by firing a teleport beam before one of them rams your ship or gets away. Below, you can see my version of the game.
As per usual, the plan is to move slowly in small steps to keep complexity of changes low. Here are the steps:
- Start with our usual PsychoPy boilerplate hidden in a context manager.
- Add a
Spaceshipand use mouse to move it along the bottom of the screen. - Create an
Alienand then the wholeAlienArmada. - Add
Laser, then aLaserGun, so that the player can fire many laser shots by pressing left mouse key. - Add check for hitting aliens with the laser and teleporting them off the screen.
- Use mixin to add teleport sound.
- Use cool iterators to cycle through lasers and aliens.
- Make alien armada move.
- Check for end-of-game.
Before we start, grab images that we will use for the game space-invaders.zip, created specifically for our seminar by Andrej Pastukhov, who said you absolutely must look at this link: Wie die Pixelarts meines Sohnes Andrej entstanden sind103.
16.5 Boilerplate
Create our usual boilerplate with an external settings file via a context manager with GameAbort exception handling. You can reuse the code from our last game but I strongly suggest checking that you understand every step. My suggestion for the window size is 640×480 because the sprites are 32×32 but chose whatever looks good on your screen.
Create GameContext and GameAbort classes.
Put your boilerplate code into code01.py.
16.6 The spaceship
Create a new file for Spaceship class. It is remarkably boring as it just an image that moves left-right on a horizontal line. Thus, we will create it as a descendant of ImageStim class. The only method that you need to define right now is the constructor __init__(). It should take Window and image filename (should be stored in settings) as parameters (plus the compulsory self, of course) and call super().__init__(...) to initialize itself via the inherited constuctor. Apart from the two parameters you have, you also need to specify the initial position of the ship via pos. The ship should be somewhere just above the lower edge of the window. For me, vertical position of -0.9 worked quite nicely.
In the main code, create an object and draw it in the main loop.
Create Spaceship class in a separate file.
Use it in code02.py.
16.7 The spaceship moves
Now, let us use the mouse to control the horizontal position of the ship and, later on, left button to shoot. First, initialize the mouse in the context manager, so that it is one its attributes (then you can use it as ctx.mouse). Then, in the main loop, use getPos() method to get the position of the mouse and use the horizontal component to alter the position of the ship. Note that you cannot assign just a horizontal or vertical components to the position via .pos[0] = .... In my PsychoPy 2021.1.4 it does not generate an error but does not change the actual position either. Thus, you need to assign a tuple of (new horizontal component, original vertical component) (the ship should stay at the same vertical position throughout the game). Test moving your spaceship around. You can make mouse invisible (see documentation) to make it more immersive.
Add mouse to GameContext
Use mouse to move ship in code03.py.
16.8 An alien appears
Before we create an alien armada, let us create a single alien. The class will be very basic, which is why, we will put both Alien and AlienArmada into the same file (so, think about its filename). The class itself is similar to the Spaceship. The only differences are that it should take (and pass) pos parameter (unlike the spaceship that always appears at the same location) and that the image should be randomly picked from a tuple of filenames (alien-1.png and alien-2.png, the names should be defined in the settings in an “aliens” group of settings). For testing, place a few aliens at arbitrary locations on the screen to check that an alien image is randomly picked. Do not forget to draw them in the main loop.
Create an Alien class
Use them in code04.py.
16.9 Using names to indicate access restrictions
Before we create an alien armada, we need to make a quick detour to talk about naming conventions for attributes and names of classes. Unlike most other languages, Python does not have private attributes or methods, i.e., attributes or methods accessible only from inside the object. If you come from Java or C#/C++, a thought that you can call any method and modify any attribute from outside should give you chills, as it becomes impossible to predict object’s behavior. Python “solves” the access problem via a “gentlemen’s agreement” that methods and attributes whose names start either with __ or _ should be considered private. In other words, you should not use them directly. In case of __, you are also prevented from doing it in a straightforward way, as the name is mangled. In the example below, you cannot access the __color attribute directly:
class ExampleClass:
  def __init__(self):
    self.__color = "red"

example = ExampleClass()

# raises AttributeError
print(example.__color)
#> 'ExampleClass' object has no attribute '__color'
But as Python does not have truly private attributes, you can still access it via its mangled nameobject._<ClassName><hidden attribute name>:
However, this is a last resort sort of thing that you should use only if you absolutely must access that attribute or method and, hopefully, know what you doing.
As noted above, you can also come across attributes with a single leading underscore in the name, e.g. _color. This is a weak “internal use” indicator, so they are fully visible. However, the leading underscore does hint that this attribute or method should be considered private. So, if you see an attribute like _color, you should pretend that you know not of its existence and, therefore, you never read or modify it directly. Of course, this is only an agreement, so you can always ignore it and work with that attribute directly104. However, this almost certainly will break the code in unexpected and hard-to-trace ways.
16.10 An alien armada appears
One alien is neither scary, nor challenging enough. We want more! For this, we will create an AlienArmada class with a twist. It will be responsible for creating a grid of aliens, moving them around (our chance to learn about special setter methods), allowing outside processes to iterate over them (iterator duck typing), and reporting the number of remaining aliens (length duck typing). As usual, we will do this one step at a time.
Start by creating an AlienArmada class, below the Alien class. Our initial version will the following methods
- a compulsory constructor,
-
spawn()that creates and places individual aliens, -
draw()that draws aliens,
and attributes
-
wina PsychoPy window, -
__posthat is a tuple with the position of the armada center within the window, -
alienswhich is a list with alien objects.
You must also expand your settings. By now you should already have an Aliens settings section with alien images’ filenames. To define the armada, we need also need to add
-
"Initial position": center of the armada, I’ve picked[0, 0.5]but you can always optimize it later on. -
"Grid size": number of aliens horizontally and vertically, I’ve used `[7, 3]. -
"Grid step [norm]": distance between aliens in “norm” units, I’ve picked 0.2.
Constructor: we will create and place aliens in a separate method spawn(), so our constructor will be very simple. As far as parameters are concerned, you need to pass a Window for creating Alien objects and a dictionary with armada-specific settings. Store both of them as attributes for later use, initialize __pos to the "Initial position", initialize aliens to an empty list and spawn() them (again, all attributes must be initialized in the constructor, even if to an empty list or None).
In the spawn() create aliens on a grid based on your "Grid size" and "Grid step [norm]" settings, so they are centered at AlienArmada’s position (__pos). All aliens go to aliens attribute, of course. Remember that they need a list of file names for visuals but you have it covered as you have them in the settings. It should look like this:
Create the AlienArmada class.
Use it in code05.py.
16.11 A laser shot appears
Now we need to create Laser class (in a separate file). Eventually, when a player presses left mouse button, the laser should appear at the location just above the ship and fly up with a certain speed. As per usual, all parameters for laser (and LaserCannon) should be stored in the settings file under a separate section (e.g., laser). For the moment, we only need to specify speed [norm/sec] (laser shot speed in norm units per second, I’ve picked 1 norm / second, so it takes 2 seconds for the shot to fly across the screen)) and, optionally, filename of the laser bitmap (but that could be also hardcoded, as we have only one image).
Let us take care of the first step: creating a laser shot just above the sheep. Create Laser class as a descendant of ImageStim (just like our Spaceship and Alien classes). It should take win, pos, and speed as arguments and call the ancestor constructor. The pos argument is the position of the ship (that fired it) but the laser must appear above it, so you need to adjust pos[1] for that (hint, you can get window height from win.size[1] and you know that sprites are 32 pixels high). The speed is in norm units per second from the settings. You need to save the speed value in an attribute for later use.
For testing, create a laser object right after you create the ship itself and draw it in the main loop. It won’t move but you will be able to see whether you’ve got the height right.
Create the Laser class.
Use in code06.py.
16.12 The laser shot flies
Let us add fly() method to the laser. It will be very simple, every time it is called the laser should move upwards. As in a Moonlander game, we need a clock to measure the time elapsed between the updates, so create it as an attribute in the constructor. In the fly() method, you need to figure out the time elapsed since the last call or since the shot was created (don’t forget to reset the timer after that) and move the shot based on its speed and elapsed time.
Remember to call fly() method in the main loop and see how the laser flies up and off the screen.
Add fly() method to Laser class.
Use it in code07.py.
16.13 We want more lasers!
Now we will create a LaserGun class that will take care of individual laser shots. It will 1) create a new Laser object whenever we fire() from it, 2) ensure that it does not overheat by allowing only one shot every N seconds (another parameter to be defined in the settings file, let’s say 0.3 s), 3) call draw() and fly() methods for all laser shots. We will create the class LaserGun in the same file as the Laser.
In the constructor, pass PsychoPy window variable and a dictionary with laser gun specific settings (these should include the speed that you specified earlier and the cool down period in seconds) and store both in attributes for later use. Initialize lasershots attribute with empty list, and create a cool down timer.
The fire() method should take position of the ship as a single parameter. If enough time passed since the last shot (check the cool down timer for that), create a new Laser at the supplied position, add it to the lasershots list, and reset the cool down timer. In draw()/fly() simply draw/fly all lasershots.
For testing, use LaserGun in place of the Laser. Both have same draw() and fly() methods that you should be calling already. In the main loop, check if left mouse button is pressed. If it is, fire() the laser gun, passing current position of the ship to it.
Create LaserGun class.
Test it in code08.py.
16.14 Too many lasers!
We do not need our lasers once they fly of the screen, so we should remove them. First, we need to know which Laser shot has expired“: is off the screen (this section) or hit its target (the next section). For this, modify the Laser class by adding an expired attribute that is set initially to False (the shot is good). In addition, write a new method check_screen_limits() that would set expired = True if the shot is above the upper edge of the window but leaves expired as is (unmodified!) otherwise (the shot could be within the screen and get expired because it hit an alien).
Next, add a cleanup() method to the LaserGun class that will call check_screen_limits() for all shots and then remove all expired ones. This is both simple and tricky! Conceptually simple: you loop over lasershots and delete any object that is expired. The easy way is to do it via list comprehension (deleting objects by not including them in the updated list) but for didactic reasons we will use del instead. If you have a list and you want to delete a second element, you write
However, there is a catch. Imagine that you want to delete second and forth elements, so that the result should be [1, 3, 5]. If you just delete second and then forth elements, you won’t get what you want:
Do you see why? Solution: start deleting from the end, this way indexes of earlier elements won’t be affected:
Note that you must use del list[index] format, so you need to use indexing in the for loop of the cleanup() method:
for ishot in backwards-index-built-via-the-range-function:
  check if lasershot has left the screen
  if self.lasershots[ishot] needs to be deleted:
    delete that self.lasershots[ishot]
Add cleanup() call to the main loop right after the fly() to automatically delete expired shots. Once you fired a few shots and they are all off the screen, put a breakpoint and check that the .lasershots is empty (your cleanup() works as it should).
Add expired property to Laser.
Add cleanup() method to LaserShot.
Use cleanup() in code09.py.
16.15 I am hit! I am hit!
Now we need to check whether a lasershot hit an alien. In that case, all the relevant aliens and shots must be removed. Removing lasershots is easy: We just set them as expired and cleanup() does the rest. Clearly, we need the same mechanism for the aliens.
Add hit attribute to the Alien class and initialize to False (an alien is not initially hit). In AlienArmada class, implement a cleanup() method, analogous to one in LaserGun that will delete any alien that is hit. Add the call to it in the main loop at the same location as for the LaserGun. You can test it by setting hit to True for one of the aliens and it should be missing.
Now for the actual check. You should loop over all aliens and laser shots attributes of AlienArmada and LaserGun checking every pair on whether they overlap. If they do, set laser shot to expired and the alien as hit. Do this check before the clean up but after the laser shots fly.
Test it!
Update Alien and AlienArmada classes
Check for laser shots hitting aliens
in code10.py, .
16.16 Duck typiing iterators
In the precious exercise, you used aliens and lasershots attributes directly in the loop. However, let us inject some coolness into our code and turn AlienArmada and LaserGun classes into iterators. Recall that you need to implement two special methods for this: __iter__(self) and __next__(self)__. The first one, initializes the loop, the second one yields the next item. The actual implementation is very simple. You need to create a new attribute that will be used to track which item you need to yield, call it iter and initialize it to None in the constructor.
In the __iter__(self), initialize the counter to 0 and return self: a returning the reference to the iterator, which is the object itself105. In the __next__(self), check if iter is within the (aliens or lasershots) list length. If it is not (i.e., you ran out aliens/shots to iterate over), raise StopIteration. If it is, increase the iteration counter and return the element it was indexing before that: Think about why you need to return self.aliens[self.iter - 1] rather than self.aliens[self.iter] or how you can use a different starting value and range check to avoid this.
Do this for both classes and use them in for loops directly, i.e. looping over aliens and laser instead of aliens.aliens and laser.lasershots.
Test it! It should work as before, of course, but with cooler duck typing inside!
Turn LaserGun and AlienArmada into iterators.
Use them as iterators in code11.py.
16.17 Got’em all!
Now, implement __len__() method for AlienArmada class that returns the number of remaining aliens. In the main loop, use it via len() function to check whether you won: no aliens left, the game is over. Use len() with the object, not with its aliens list attribute!
Add __len__() special method to AlienArmada class.
Use it to check whether all aliens are hit
in code12.py.
16.18 Ping!
Now let us use a HitSoundMixin class that defines a single hit() method (no constructor!) that plays the teleport.wav sound106 from materials. It can be a single line method when you both create and play the sound in one go, no temporary variable or an attribute are required. When you use it as an ancestor for the Alien class, it has that hit() method. Call it when you set hit to True.
Create HitSoundMixin class.
Mix it into the Alien class.
Use it in code11.py.
16.19 Virtual attributes via getters and setters
Our next detour is to learn how you can create a private attribute (within the limits of Python, of course). Recall that we have a __pos attribute of an AlienArmada class that defines its location. The catch is that changing the position of the armada means changing position of all the aliens that constitute the armada. This means that we need write a method that receive a new position for the armada and updates both the __pos attribute and positions of individual aliens. And that is exactly what getter/setter methods are for. They are declared via special decorators107: @property and @<name>.setter. You already know the former one that we used to compute a value on-the-fly. But it also be used to get a value of a “private” attribute, which is why it is called a “getter” method. The latter decorator, is for a “setter” method that sets a new value to a private attribute. The idea of using them together is to isolate an actual attribute value from the outside influence. It is particularly helpful, if you need to control whether a new value of an attribute is a valid one, needs to converted, additional processing, etc. For example, color attribute of the rectangle stimulus uses this approach, which is why it can take RGB triplets, hexadecimal codes, or plain color names as a value and set the color correctly.
Here is a sketch of how it could work for a virtual attribute for color. One typically creates an internal attribute with almost the same name, e.g., _color or __color. The value is stored and read from that internal attribute by getter and setter methods:
class ExampleClass:

  def __init__(self):
    self.__color = "red"

  @property
  def color(self):
    """
    This is a getter method for virtual color
    attribute.
    """
    # Here, we simply return the value. But we could
    # compute it from some other attribute(s) instead.
    return self.__color

  @color.setter # not the most elegant syntax, IMHO
  def color(self, newvalue):
    """
    Note that the setter name has THE SAME name as the getter!
    It sets a new value and does not return anything.
    """

    # Here, you can have checks, conversion,
    # additional changes to other attributes, etc.
    self.__color = newvalue


example = ExampleClass()

# get the value, note the lack of () after color
print(example.color)

# set the value
example.color = "blue"
Note that there is no actual attribute color108, yet, our code works as if it exists.
There is another twist to the story. If you only define the getter @property method but no setter method, your hidden property is read-only109!
16.20 The alien armada jumps
Currently, our aliens are sitting ducks. No fun! They need to get a move on. But before we can move alien armada around, we need to be able to change its position. So let us write getter/setter methods for it. To start with, define a getter, as it only needs to return the value of the hidden position attribute.
Now to more complicated and, hence, fun bit! Remember, we need to move all individual aliens relative to the center of the armada. For this,
- compute the change in its position based on current and new value,
- use it to alter position of individual aliens based on their current position,
- store the new position in the private attribute.
Test it by making armada jump to a random location every time you press space button. The armada should keep its formation!
Implement getter/setter methods for __pos in AlienArmada.
Test it in code12.py.
16.21 The alien armada moves
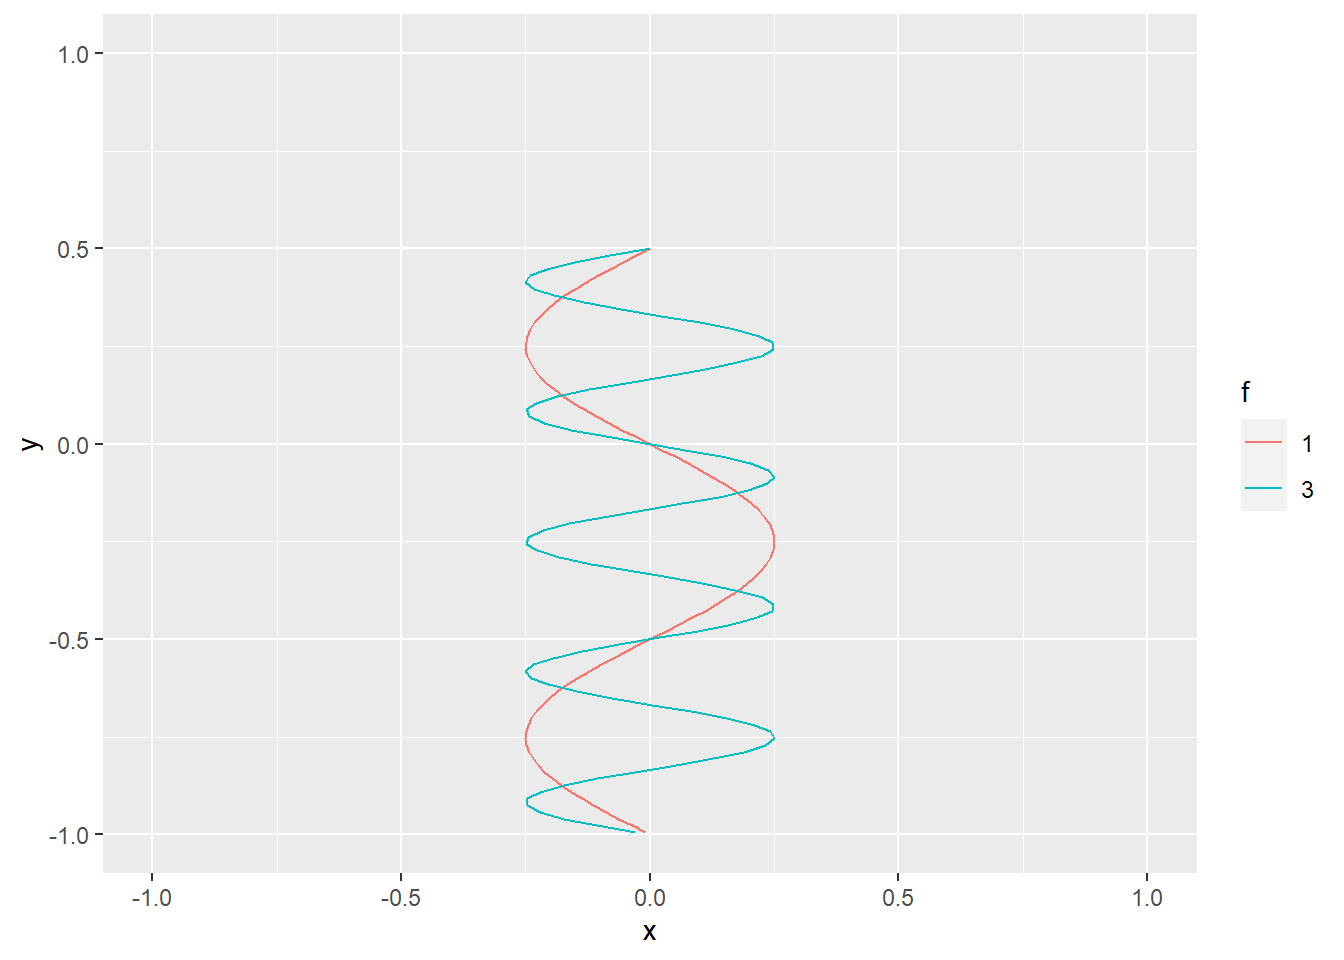
Our alien armada will move downwards along a sine trajectory:
\[x = x_{max} \cdot sin(2 \pi f \cdot (y-y_{origin})) \]
where \(x_{max}\) is maximal deviation of the center of the armada from the middle of the screen (I’ve set it to \(0.25\)), the \(f\) is the frequency, i.e., how fast is horizontal movement (I’ve set it to \(3\) but you can see how much slower it would be for \(1\) in the plot below), \(y\) is the current vertical coordinate of the armada and \(y_{origin}\) is the initial one (\(0.5\) in my case). As with all other parameters, these should be part of the settings file plus vertcal speed [norm/sec] that defines how fast the armada will fly down (I would set it to 0.1, so it takes 15 seconds to fly down).
For the armada to fly, we need to add a timer (in the constructor) and define a fly() method that
- computes the times since the armada creation
- computes current vertical position based on the starting location, elapsed time (from the timer), vertical speed defined in settings
- computes current horizontal position given the formula above and the relevant settings
- updates current position via a simple
self.pos = (new_x, new_y)(the setter method will take care of the rest)
In the main loop, call fly() when you call it for laser gun.
Add fly() method to AlienArmada class.
Use it in code13.py.
16.22 The alien armada wins: crash!
So far, the player always wins. Let us make it more dangerous! They will lose if either an alien crashes into the spaceship or if the armada goes past the ship. Implement the former the same way as you checked whether laser shot hit an alien: loop over aliens and see if they overlap with the spaceship (game over if they do). Implement and test.
Implement crash-into-ship in code14.py.
16.23 The alien armada wins: missed them!
The second way to lose the game, is if at least one alien got past the ship. For this, we need to check the position of the lowest alien and if it is lower than that of the spaceship, the game is over. You can do it in the same loop you are checking for the hit but, for didactic reasons, let us practice @proprety a bit more. Implement a new computed (read-only) property lowest_y of the AlienArmada class that will return the y-coordinate of the lowest alien in the armada. You need to loop over individual aliens to find the lowest y and return it. There are different ways to do it, come up with one yourself! In the main code, add the check and make sure the game is over, if aliens got past the player.
Add lowest_y computed property to AlienArmada class.
Use it in code15.py.
16.24 Mixin teleport
Mix in the teleport sound method to the Spaceship and play it if alien crashed into it.
Mix in teleport to Spaceship class.
Use it in code16.py.
16.25 Game over message
Create a blinking game over message that will reflect the outcome. Something like this but use your imagination:
- “Congrats!”, if the player won.
- “Crash! Boom! Bang!”, if the player was hit.
- “They got away!”, if the armada got past the player.
One way to simplify you life is to rename gameover variable into the gamestate variable. Initially, it could be "playing", so your loop repeats while gamestate == "playing". Then, you can set it based on the type of the event ("victory" when player wins, "hit" when they were hit by the armada, "missed" if aliens got away) and use it after the main loop to determine which message to show. Better still, use dictionary for this instead of if-else. Or “cheat” and store the message in the variable itself.
Put your updated code into code17.py.